
I've got a lyrik rc2, 180 mm fork with a coil kit and was wondering if uprading with a charger 2.1 or a hc97 would be worth it considering the high price of those upgrades ? I'm a 165 lbs agressive rider and while I've noticed the fork does sit in it's travel quite a lot, it's been very good so far, no harsness at all. Am I gonna see an improvement with one of those 2 parts ? One thing bugging me is that the hsc and lsc adjustments seem to do nothing on the fork but besides, I'm quite happy

Charlo489
HC97 vs charger 2.1
Charlo489
Discussion starter
184 posts
·
Joined 2013
- Add to quote
I've got a lyrik rc2, 180 mm fork with a coil kit and was wondering if uprading with a charger 2.1 or a hc97 would be worth it considering the high price of those upgrades ? I'm a 165 lbs agressive rider and while I've noticed the fork does sit in it's travel quite a lot, it's been very good so far, no harsness at all. Am I gonna see an improvement with one of those 2 parts ? One thing bugging me is that the hsc and lsc adjustments seem to do nothing on the fork but besides, I'm quite happy
718 posts
·
Joined 2017
Yes, yes. I get that. I honestly don't care about it. I care about the technical aspects that you were originally trying to make.
Your original argument seemed to be that the stock midvalve is the dominant restriction at high speeds and the HC97 won't fix it?
Your original argument seemed to be that the stock midvalve is the dominant restriction at high speeds and the HC97 won't fix it?
17,486 posts
·
Joined 2004
You've got the technical aspects wrong though. I made no claims about the HC97 performance.
All I have said about midvalve is the pressure gradients and forces add with the basevalve.
Darren said this wasn't true because the HC97 eliminates the midvalve. A claim that is complete fiction.
Then we cue mass hysteria, cheerleaders piling on and a massive amount of further disinformation from Darren.
Original totally false claim remains: https://forums.mtbr.com/shocks-suspension/push-hc97-charger-upgrade-1101538-2.html#post14118371
2,131 posts
·
Joined 2004
Ok, genuine question...
The HC97 does away with shims (which I always thought were highly adjustable and they were what you wanted in suspension) and relies on a spring. So then how do they adjust the spring for your type of riding and body weight? Do they just use one size-fits-all spring and just pre-load it, or do they have different springs when they assemble them?
The HC97 does away with shims (which I always thought were highly adjustable and they were what you wanted in suspension) and relies on a spring. So then how do they adjust the spring for your type of riding and body weight? Do they just use one size-fits-all spring and just pre-load it, or do they have different springs when they assemble them?
2,101 posts
·
Joined 2006
The displacement of a poppet valve is so small that the rate doesn't make any difference, only the preload force and port size/shape. A different rate spring would just shift the range of adjustment but where the ranges overlap it would be basically the same damping curves.
2,131 posts
·
Joined 2004
Ahhh ok... makes sense. I suppose I have to re-visit the Push site and this thread to figure out why you don't want shims AND the spring. Shims for that internal custom tuning and then the spring for blow off once the oil pressure gets too high for the shim stack.
2,101 posts
·
Joined 2006
If you have shims the open first with a spring blow off, the shims tend to have very little effect on the curve and just "blend" the opening a little bit. If you have shims with a spring preload then you have the same problem of creating too much HSC at very high speeds if you add enough damping where you need it.
Having dyno'd the HC97 I can say that it adds force in a very specific speed range, and then once the valve opens the force drops away enough that it can still soak up the bigger hits.
I'm reluctant to give an more detail than that as it's Push's proprietary damper and Darren can describe it better anyway. Plus people on the internet tend to take things wildly out of context!
17,486 posts
·
Joined 2004
Your dyno is limited to 0.8 m/s right? I'd be very careful extrapolating that out to big hit velocities. At a minimum you'd want to calculate out damping from fixed ports and tubes to see how much they contribute at higher speeds.
Don't forget. You've gotta be nice to Push if you want to be their next NZ agent.")
Don't forget. You've gotta be nice to Push if you want to be their next NZ agent.
456 posts
·
Joined 2016
Can a B1 Pike RC damper be used with the HC97? I'm guessing not. I do have a charger2 as well, but would rather donate the rc to the cause if possible.
17,486 posts
·
Joined 2004
Nope.
Go ahead and tell us what you think you're measuring.Never said I was measuring force 😉 how about you try reading comments without assuming the writer is stupid just once aye?
9,038 posts
·
Joined 2004
Admittedly I am a Push fan-boi but I also appreciate Dougal’s technical acumen.
I publish in peer-reviewed journals in my line of work. I know plenty of scientists like Dougal. They press hard and challenge and more often than not they are correct. However, because they are borderline bullies about it they also suppress new ideas and changes in long held paradigms. Thus, they may or may not advance the science.
Guess that’s what I think about when I read the tit-for-tat. Arrogance rarely leads to the desired outcome.
29,577 posts
·
Joined 2003
Wait... I thought I was the bully. Lol.Admittedly I am a Push fan-boi but I also appreciate Dougal's technical acumen.
I publish in peer-reviewed journals in my line of work. I know plenty of scientists like Dougal. They press hard and challenge and more often than not they are correct. However, because they are borderline bullies about it they also suppress new ideas and changes in long held paradigms. Thus, they may or may not advance the science.
Guess that's what I think about when I read the tit-for-tat. Arrogance rarely leads to the desired outcome.

328 posts
·
Joined 2017
Dougal. You are an amazing man. You truly know more than the rest of us. Not only when it comes to suspension engineering, but also when in life lessons. You have lived more than most of us.
It's just a shame your only real credentials are a piece of paper and being a Manitou crony
It's just a shame your only real credentials are a piece of paper and being a Manitou crony
17,486 posts
·
Joined 2004
Ladies and Gentlemen. I do believe we have peaked.
Pure ad-hominem. Check.
Zero argument or point of discussion. Check.
Dripping with sarcasm. Check
Zero history in the topic. Check.
Username also includes KKK rank. Wow.
Pure ad-hominem. Check.
Zero argument or point of discussion. Check.
Dripping with sarcasm. Check
Zero history in the topic. Check.
Username also includes KKK rank. Wow.
10,106 posts
·
Joined 2009
I'm not even sure what this is about anymore, but it's hilarious.
Except calling yourself the grand wizard. Wtf is up with that?
Except calling yourself the grand wizard. Wtf is up with that?
10,106 posts
·
Joined 2009
I did just see that push recorded pro data at 8.5ms and 7ms. If we suck really bad, couldn't we still hit 2ms? Why is there such a focus on <1ms and no one cares about totally non theoretical higher speeds, when double or even triple, or 8x the posted 1ms speeds are doable?
High speed choking is real. If pros can hit a value, isn't that the absolute upper limit we should be looking at?
High speed choking is real. If pros can hit a value, isn't that the absolute upper limit we should be looking at?
17,486 posts
·
Joined 2004
I think it matters and put work into making sure those high speeds can work nicely. But I appear to be alone with that.
17,486 posts
·
Joined 2004
I think that topic deserves it's own thread.
BTW. Choke has a specific meaning for fluid flow. If you've never studied fluids it may make no sense.
BTW. Choke has a specific meaning for fluid flow. If you've never studied fluids it may make no sense.
2,101 posts
·
Joined 2006
Ah yes, when you have no evidence to back anything up, resort to the "remember how I'm an engineer and you're not?" Approach
17,486 posts
·
Joined 2004
Suspension Velocity thread started here: https://forums.mtbr.com/shocks-suspension/suspension-velocities-1132949.html#post14652945
10,106 posts
·
Joined 2009
I get that its uncommon, just not impossible. Real high speed events are the whoops incidents. Like flying down a smooth trail, and suddenly hitting a large square rock. Clipping the lip of a jump will do it too. Basically the whole industry ignores those events... but I dunno, its relevant, isnt it?
Choke means the orifice you're pushing fluid through is causing a restriction, like a thumb on a hose, right? Thats what smashing a rock feels like on most suspensions. I took one semester of fluid dynamics, a half assed understanding is as good as i get. :lol:
You guys (push) made a product that fixes a fork in an area that we spend 99% of our riding time, right? I think any reasonable person can see the tremendous value in that. But still, you're saying that one section of trail produced that data, and 10 events were >2ms. Thats still 10 events on one trail section.
I want to know what happens when I smash that big rock head on or clip a lip with my front tire. Even if it doesnt happen every ride, its nice to have as a comparison.
2,734 posts
·
Joined 2004
This is what I'm currently doing....I will have a very comprehensive set of answers very soon.I get that its uncommon, just not impossible. Real high speed events are the whoops incidents. Like flying down a smooth trail, and suddenly hitting a large square rock. Clipping the lip of a jump will do it too. Basically the whole industry ignores those events... but I dunno, its relevant, isnt it?
Choke means the orifice you're pushing fluid through is causing a restriction, like a thumb on a hose, right? Thats what smashing a rock feels like on most suspensions. I took one semester of fluid dynamics, a half assed understanding is as good as i get. :lol:
You guys (push) made a product that fixes a fork in an area that we spend 99% of our riding time, right? I think any reasonable person can see the tremendous value in that. But still, you're saying that one section of trail produced that data, and 10 events were >2ms. Thats still 10 events on one trail section.
I want to know what happens when I smash that big rock head on or clip a lip with my front tire. Even if it doesnt happen every ride, its nice to have as a comparison.
Darren

2,101 posts
·
Joined 2006
But if you have a 60kg rider on top of the bike, when the forces start climbing you are either going to be lifting the rider above a certain speed or unbearable pain from the damper. I have riders that size on a Yari getting to 5m/s with no problems like that at all
17,486 posts
·
Joined 2004
I haven't made any claims at all regarding Motion Control and choking.
718 posts
·
Joined 2017
Does "choked flow" actually happen in a damper? If it did, wouldn't you actually see a reduction in damping force as choked flow causes cavitation.
718 posts
·
Joined 2017
Dougal, (or anybody else of course) correct me if I'm wrong, but maybe a visual representation of your theory can add to this topic. This is of course completely arbitrary values, largely selected to attempt to point out a situation where a mid-valve might "overpower" a basevalve. It's also fairly hard to keep everything sorted out as there are multiple things adding together to get the total.
![]()
Basevalve
Dashed Orange - Pressure differential (Force) generated by the LSC adjuster
Dashed Red - Poppet valve HSC with a soft slope but higher preload.
Long Dashed Red - Combined Basevalve Force. This puts the HSC and LSC adjusters in parallel. The total force of the combination will always be less than the individual force of the components. This is essentially what the damping would be with an "ideal" check valve setup on the "midvalve."
"Midvalve"
Dashed Blue - Force from the flow through the ports in the midvalve.
Dashed Yellow - Force generated from the flow through the check shim.
Long Dashed Green - Combined forces of midvalve ports and check shim. The flow path is in series so the forces add directly together.
Total Damper Response
Solid Purple - Total damper force. This puts the midvalve in series with the basevalve and the forces are added. As
A few notables here in this hypothetical situation.
1. The midvalve force doesn't overcome the basevalve force until ~4 m/s, but the midvalve has already started having a signifigant impact by 2m/s.
2. Despite the LSC adjuster "choking" at a low speed, it will still soften the basevalve damping at speeds well above there. If LSC bypass flow is high enough, it can mask the basevalve response completely, but the midvalve still adds on top of it and can still dominate the total response. However, without the basevalve pressure, the system can cavitate on the backside of the mid-valve, then all of this goes out the window.
17,486 posts
·
Joined 2004
Yes in that example over 4.m/s the mid-valve will pull negative pressure on the seal-head.Dougal, (or anybody else of course) correct me if I'm wrong, but maybe a visual representation of your theory can add to this topic. This is of course completely arbitrary values, largely selected to attempt to point out a situation where a mid-valve might "overpower" a basevalve. It's also fairly hard to keep everything sorted out as there are multiple things adding together to get the total.
Choked flow is still flow. Your BV HS stack is keeping it all under control until that 4 m/s mark.
Depending on the magnitude of that it could cavitate or pull in air. Thus dropping the damping forces and foaming up the oil. Which further deteriorates damper performance.
If you'd like to draw a Charger 1 damper in that graph the LSC flow is huge, the HSC stack is retardedly stiff and the pressures invert much earlier.
285 posts
·
Joined 2016
Well there was no info on the settings so I assumed it was done with adjusters at about half way like usual, so there would also be some range for the low speed adjustment left(assuming charger 2.1 actually has a functional LSC adjustment) and preload adjustment left by "opening" the hsc setting.
Actually custom tuned could also mean eliminating that preload from the HSC adjuster spring totally, resulting in a lot softer LSC.
A 8x18x0.8mm shim and a 8x12x0.3(both of them floating ontop of the original 6x8 clamp shims) on top of the original stack would make the HSC adjuster actually adjust compression damping and not the preload(ofcourse they would also add a lot of hsc if the float wasnt big enough, float could be increased by swapping the clamping shim thicker).
718 posts
·
Joined 2017
I'm not following how this would change the basic function of the adjuster? Wouldn't a preloaded, floating stack still just adjust the knee position, but not the slope? The slope would still be controlled by the shims and the spring rate of the adjuster?A 8x18x0.8mm shim and a 8x12x0.3(both of them floating ontop of the original 6x8 clamp shims) on top of the original stack would make the HSC adjuster actually adjust compression damping and not the preload(ofcourse they would also add a lot of hsc if the float wasnt big enough, float could be increased by swapping the clamping shim thicker).
And for clarity, are these floating shims in contact with the base shim stack at zero velocity because of the preload spring? Doesn't seem like it would take a while lot of spring force to bend the floating shims down to the stack, but maybe not?
2,101 posts
·
Joined 2006
I think the 8x12 slides over the current clamp shim against the bending shims, while the 18mm sits against the hsc preloader. I guess the idea is with no preload on the adjuster the floating shims aren’t doing much, but adding preload turns them in to like a “helper” clamp shim. Is that close?
285 posts
·
Joined 2016
Yea, thats the concept.I think the 8x12 slides over the current clamp shim against the bending shims, while the 18mm sits against the hsc preloader. I guess the idea is with no preload on the adjuster the floating shims aren't doing much, but adding preload turns them in to like a "helper" clamp shim. Is that close?
2,101 posts
·
Joined 2006
I’ve thought about a similar idea but never tested it, actually I do know of an adjuster like that though come to think of it. With a careful clamp diameter and spring rate selection it might work pretty well
253 posts
·
Joined 2021
BOS uses this since quite some time in their forks, again posting my picture of the 2014 Idylle RaREI've thought about a similar idea but never tested it, actually I do know of an adjuster like that though come to think of it. With a careful clamp diameter and spring rate selection it might work pretty well
:
HSC adjuster will move the piston towards the base assembly (in the picture to the left), preloading the spring. Which pushes that ring on the stack, acting as a 2. clamp.
718 posts
·
Joined 2017
Guess I needed to pay closer attention to those thickness and diameter details. Yeah, I get what you are saying now. Interesting idea, wonder how much of an impact it could have.
17,486 posts
·
Joined 2004
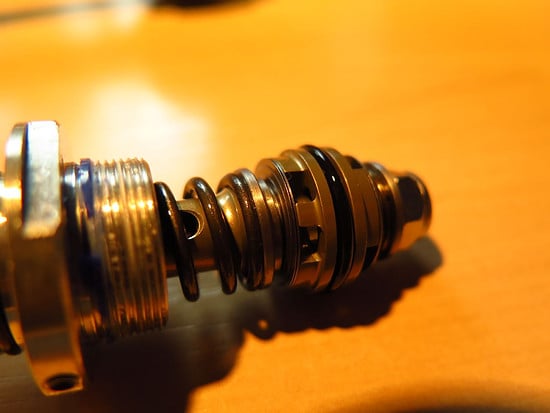
For anyone interested in quantifying the mid-valve effect. The easiest way to confirm there is an influence is to compare compression forces when rebound is open vs closed.
On this damper (example is a Charger 2 RCT3, totally stock) there is over 1.5kg change in compression force at only 1m/s.
This is huge. This difference alone can screw up a tune. This is also not the total mid-valve effect. It is only the portion we can see by changing rebound setting.
![Image]()
On this damper (example is a Charger 2 RCT3, totally stock) there is over 1.5kg change in compression force at only 1m/s.
This is huge. This difference alone can screw up a tune. This is also not the total mid-valve effect. It is only the portion we can see by changing rebound setting.
10,106 posts
·
Joined 2009
I'm confused on the mid valve.
What is the concept behind the aftermarket fixes? Just a higher flowing piston that lets the comp piston do the damping? Or is it retuned and still intentionally generating damping?
Why are forks made that choke here, specifically? Is it just to reduce machining costs?
Something isn't clicking. Seems like a dumb choke point.
17,486 posts
·
Joined 2004
The point of a mid-valve is to produce damping force quickly. Because oil velocities are highest there you can produce a lot of damping faster than a base-valve can. Especially if you are dealing with foamed oil (open bath forks).I'm confused on the mid valve.
What is the concept behind the aftermarket fixes? Just a higher flowing piston that lets the comp piston do the damping? Or is it retuned and still intentionally generating damping?
Why are forks made that choke here, specifically? Is it just to reduce machining costs?
Something isn't clicking. Seems like a dumb choke point.
For a heavy chassis and foamed oil they make a lot of sense. But I think it is misapplied to MTB where we have light chassis, high velocities and closed cartridge dampers.
-
?
-
?
-
?
-
?
-
?
-
?
-
?
-
?
-
?
-
?
-
?
-
?
-
?
-
?
-
?
-
?
-
?
-
?
-
?
-
?
- posts
- 16M
- members
- 535K
- Since
- 1990
A forum community dedicated to Mountain Bike owners and enthusiasts. Come join the discussion about bike parts, components, deals, performance, modifications, classifieds, trails, troubleshooting, maintenance, and more!
Explore Our Forums


